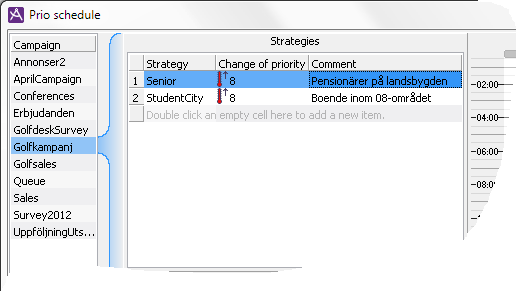
Priority strategies for a campaign is configured via the Prio schedule... button at bottom right part of the Campaigns window, found under the Media | Outbound telephony | Campaigns... menu choice.
This is how you proceed to create a new strategy in Prio schedule window:
Under the Record selection rules you specify one, or up to twenty selection rules for the strategy selected in the field above.
First you pick a contact data key from a drop-down menu.
Between the Key and Value headers, you set a Relation:
equals (=), not equal (<>) or if it is a number you will be specifying, less than (<) and greater than (>).
Finally you enter the value constituting you records selection.
Under the search box you specify with a radio button whether the records must match exactly all the search criteria you have specified, or whether it is enough for the records to match at least one of the specified selection criteria.
When you have named a strategy, you can schedule it. The schedule to the very right in the Prio schedule window, is a weekly schedule and you can select several various time intervals per day, the same or different for weekdays and weekends, down to 30-minute intervals. Different priority strategies can follow after each other, such as:
CallGuide allows up to 200 schedules per strategy.

To schedule a strategy, you must first make sure that the relevant strategy is selected.
Then you select, in the right-hand part of the Prio schedule window, the time intervals when you want this strategy to be active. Drag your mouse pointer over days and hours, holding down your left mouse button. Then you proceed with one of the following:
In the schedule part of the Prio schedule window, you see the periods scheduled for the selected strategy in a lighter shade. Each time block shows by a figure to which strategy in the list to the left it belongs.
The changes are saved when you close the window using the OK button. However, a priority schedule is only applied if the campaign is started.
You can remove the schedules for several strategies at one go.
To delete something in the schedule part of the Prio schedule window, you select the whole or parts of scheduled areas with your mouse pointer, holding down the left mouse button. Then you do one of the following:
You change the schedule for a strategy by removing unwanted time intervals, and adding new ones. The changes are saved when you close the window with the OK button. All changes take effect immediately. If you e.g. start a campaign with a priority schedule, whose start time has passed, but whose stop time has not yet come, or change a schedule to just having passed the start time, the priority strategy will be activated automatically.
The category of records, that is given higher priority at a given hour, will be reset to its original priority at the end of the default time interval. At the times when the priority shall be changed, i.e. when the priority strategy is activated or inactivated, all records in the campaign are revised. This may lead to a temporary stop in the dialling, until the priorities are done. Most of the time you do not even notice this stop, depending on the number of records there are in the campaign.
In connection with activation/inactivation you cannot do anything involving campaign records, i.e. you cannot
Records that are imported to a campaign where a priority strategy is applied will only be affected by the priority strategy when it is activated the next time. However, it is possible to manually stop and then restart the campaign after a minute, in order to force the system to change the priority for the material again.
You can see if a priority strategy is active for a campaign via CallGuide Pulse’s campaign progress window. You can also see if activation or inactivation is in progress.
When scheduling new strategies it could be good to have an overview of the existing schedules in your CallGuide solution, for example, in order for all campaigns not to have priority changes at the same time. If multiple campaigns have priority strategies that are being activated or inactivated at the same time, CallGuide will deal with them by turns, resulting in the activation or deactivation for a specific campaign does not occurring exactly at the configured time.
In the Concurrency check window, opened with the Concurrency check... button, at the bottom left of the Prio schedule window, you see a compilation of all schedules made for all the organisation area’s started campaigns.
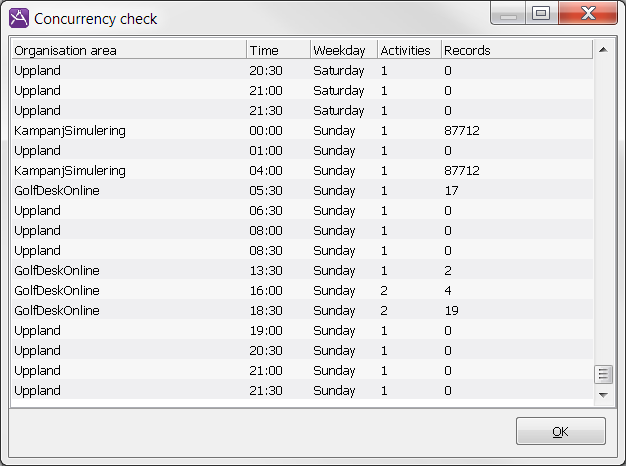
You can, for each organisation area, hour, and day of the week, see the number of scheduled activations and inactivations, and the number of campaign records that cam be involved simultaneously in changes in priority.